Main Dialog
The main window shows a list of downloaded files. This list includes additional information about downloaded files like file size, download status, estimated time to complete, current download speed and download description. You can sort the list by any column by clicking on a column header.
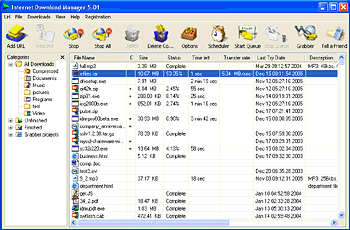
Download control buttons ("Add URL", "Resume", "Stop", "Stop All", "Delete", "Delete Completed", "Options", "Scheduler", "Start Queue", "Stop Queue", "Tell A Friend") are located above the list. They can be in active or disabled state depending on what actions are possible for the current selection of downloads.
Click on "Tell a Friend" button to tell your friends about Internet Download Manager!
You can add a new file to download with "Add URL" button.

You can either enter new URL in the text box or select URL from existing ones. You can also specify login information if the server demands authorization by checking "Use authorization" box.

If URL format is valid, "Download File Info" dialog will appear where you can type file description and choose the path where the file is to be saved. Alternatively you can add description later in "Download Properties" dialog. There are three buttons on the bottom of the dialog window. If you want to cancel the download, press on "Cancel" button.
If you want to start downloading immediately, press on "Start/Resume" Download. That will bring file IDM file download dialog. The dialog let you get an additional control over the download. It also shows download progress, average download speed, estimated time to complete, current download state, whether resume is supported by the server, etc. The dialog also has a chart to display download progress for each downloaded file segment.
You can press "Pause" button to postpone downloading, or "Cancel" to stop download and to close the dialog. You can always resume download at any time. Note that "Resume" button restarts download from the last saved position only if remote server supports this function.
"Stop" button stops downloads for selected files. You can also stop download by pushing "Cancel" button in File Download dialog or by closing the dialog. "Stop All" button stops all downloads in progress.
"Delete" button deletes selected files from the download list. It's enabled only for complete or paused file downloads. If file download is not complete, IDM will ask for the confirmation to delete it from the list.
"Delete Completed" button (available only in registered versions) deletes all complete downloads from the list.
"Scheduler" button starts Scheduler dialog window where you can set timer to execute download tasks. "Q" column shows whether the file is in download queue. You can add/delete file from the queue by right clicking on file name and picking "Add to Queue" and "Delete from Queue" menu items.
All main controls are also available in "Downloads" menu as well as in pop-up menu with the right mouse click on a downloads in the download list.
You can pick "Properties" item in pop-up menu to see/edit properties of the selected file. You can change the location to save file, add description, change URL or server login information (username and password).
Categories
In the left side of the main part of the window is a tree of download categories. Internet Download Manager offers the categories feature to organize and manage your files. If you don't need it, you may simply close "Categories" panel and don't select any categories when downloading files. Every download category has a name, a default download directory and a list of associated file types. IDM has several predefined categories like Music, Video, Programs, Documents, etc. You may delete, edit them, or add your own categories.
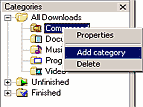
Right clicking on a categories item will show a menu to allow you to add a new categories, or to edit or delete existing items. When adding a category, you may choose the file extensions to associate with the category, and you may select the default download directory where to place the files of this category. Also if you enable "Automatically put in this category the files from the following sites only" checkbox, you can configure your custom category to put in it files only from specific site(s), for examplle "*.googlevideo.com" (actual download server for YouTube videos).
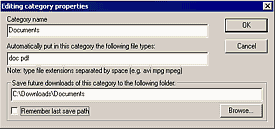
For example, Documents category could have the following extensions "DOC PDF XLS TXT" and the following default download folder "C:\Downloads\Documents".
IDM will suggest the category and the folder automatically when you download or save files that match the list of file types. If you disable save file dialogs in IDM options, IDM will place downloads to their designated categories automatically.
The customization of the look of IDM main window
Internet Download Manager has a feature to customize columns and the look of the toolbar.
The standard version of Internet Download Manager has 4 built-in toolbar looks: Large 3D buttons, Small 3D buttons, Large Neon buttons and Small Neon buttons. You can select the toolbar look that you like from these choices, or you may download a new look from Internet Download Manager home site. If you are familiar with graphics design basics, you may also draw your own toolbar for your Internet Download Manager. You may also customize what buttons should appear on the toolbar and in what order.
To customize IDM toolbar look, please right click on the toolbar and the right click menu will appear (look below).
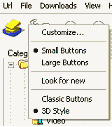
You can select the toolbar style and the toolbar button size from the choices available in this menu. If you need to download new toolbar look for Internet Download Manager, please pick "Look for new toolbars" menu item.
To customize toolbar buttons, please select "Customize..." menu item.
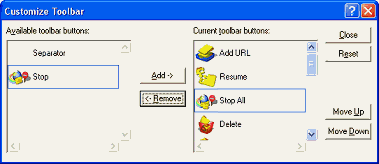
In this dialog you can control what buttons should appear on IDM toolbar and in what order. Left pane of the window shows the list of available buttons. Right pane shows the list of buttons in IDM toolbar. You can order buttons by selecting a button in this list, and pressing "Move Up" or "Move Down". You may add and remove buttons by selecting a button, and pressing "Add" or "Remove".
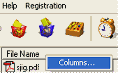
To customize IDM columns on the main window, right click on a column header and select "Columns"
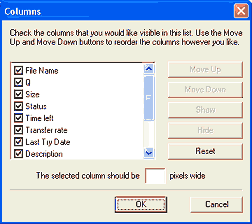
You may select what columns should appear, the width of columns, and the columns order. To enable a column, you should check the corresponding check box for the required column. You may move the column to another location by selecting it, and using "Move Up" and "Move Down" buttons. You may also change the order of columns by dragging and dropping a column header on the required place in IDM main window.